Understanding Vapor Barrier Installation
A vapor barrier is a critical component in maintaining a dry environment in areas of your home susceptible to moisture, like crawl spaces and basements. If you’re looking to protect your home from water damage, mold growth, and structural decay, understanding Vapor Barrier Installation should be your first step. This guide aims to educate homeowners and contractors alike on the importance, materials, and methods needed for effective vapor barrier installation.
What is a Vapor Barrier?
A vapor barrier is a material designed to resist the passage of moisture from the ground or air into the living environment of your home. Typically made from polyethylene plastic, vapor barriers are used to prevent moisture from seeping through floors and walls in areas that are prone to dampness. They are commonly installed on the ground in crawl spaces, on walls, and even between the foundation and the rest of the structure.
Importance of Vapor Barrier Installation
Vapor barrier installation is vital for several reasons:
- Mold Prevention: High humidity levels can lead to mold growth, which poses severe health risks.
- Preservation of Structural Integrity: Moisture can weaken wood and metal structures, leading to costly repairs.
- Energy Efficiency: A properly installed vapor barrier helps maintain consistent indoor temperatures, lowering energy costs.
- Improved Indoor Air Quality: A dry environment minimizes allergens and improves overall air quality.
Common Misconceptions
Many homeowners hold misconceptions about vapor barriers that can hinder effective installation. Here are a few:
- Vapor Barriers are Only Needed in Wet Climates: Moisture can infiltrate homes even in dry environments, necessitating vapor barriers in all climates.
- All Plastic Sheeting is the Same: There are various types and thicknesses of vapor barriers, each designed for specific applications.
- DIY Installation is Simple and Risk-Free: While DIY is possible, incorrect installation can lead to more moisture problems down the line.
Materials and Tools Needed for Vapor Barrier Installation
Types of Vapor Barriers
Choosing the right type of vapor barrier is crucial for effective moisture control. Here are the most common types:
- Polyethylene Sheeting: The most common type, available in various thicknesses ranging from 6 to 20 mil. Thicker barriers provide better moisture resistance.
- Foil Barriers: Made from reflective foil, these barriers work best in areas where humidity is high, as they reflect heat away.
- Liquid Barrier Systems: These are applied like paint and create a seamless moisture-proof layer. Ideal for irregular or complex surfaces.
Essential Tools for Installation
Before installation, gather essential tools to ensure a smooth process:
- Utility knife or scissors for cutting materials.
- Measuring tape for accurate dimensions.
- Stapler or tape for securing the barrier.
- Paintbrush or roller if using liquid barrier systems.
- Heavy-duty gloves to protect your hands during installation.
Safety Equipment Suggestions
Safety should always be a priority during installation. Equip yourself with the following:
- Dust mask to prevent inhalation of dust and mold spores.
- Safety glasses to protect your eyes from debris.
- Fitted gloves to protect your hands.
- Long-sleeved clothing to minimize skin exposure.
Step-by-Step Guide to Proper Vapor Barrier Installation
Preparing the Site
Preparation is key to a successful installation. Follow these steps:
- Clean the crawl space or area thoroughly by removing debris, old insulation, and any moisture-infested materials.
- Inspect the foundation for cracks and seal any gaps to prevent moisture entry.
- Ensure proper drainage away from the foundation to minimize water pooling.
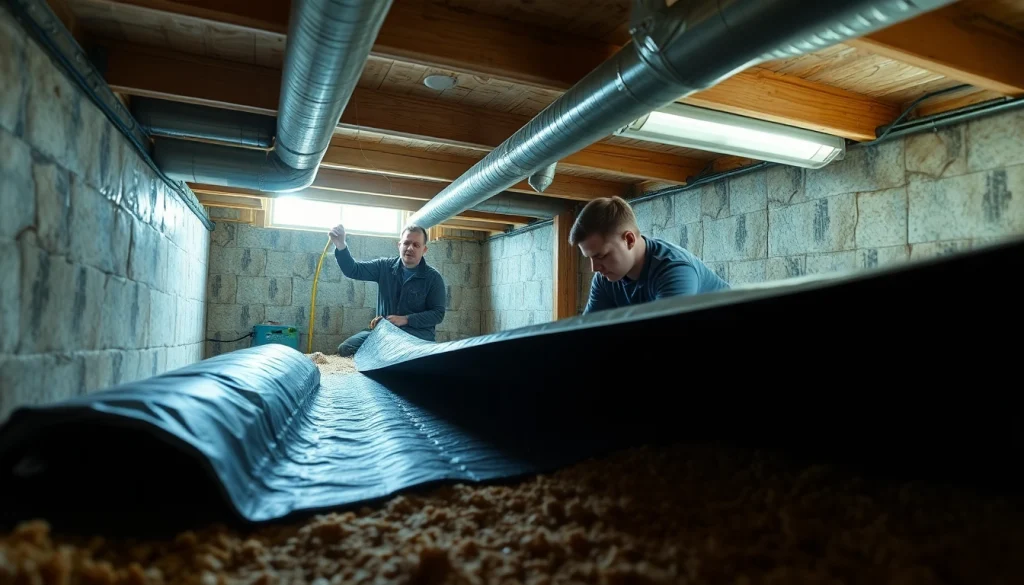
Installing the Vapor Barrier
Once the site is ready, proceed with these installation steps:
- Unroll the vapor barrier material across the designated area, ensuring it extends at least 12 inches up the walls.
- Overlap seams by at least 12 inches and secure them with high-quality tape or staples.
- If you’re using a liquid barrier system, apply it with a brush or roller according to the manufacturer’s instructions.
Sealing and Inspecting for Quality
After installation, follow these steps to ensure effectiveness:
- Seal all edges and seams carefully, ensuring no gaps are left open.
- Inspect the installation for any areas where moisture could penetrate.
- Test your crawl space humidity levels using a hygrometer to confirm effective moisture control.
Best Practices for Long-Lasting Vapor Barrier Installation
Maintenance Tips
Maintaining your vapor barrier is essential for ongoing effectiveness:
- Regularly inspect the barrier for tears or wear, particularly at seams.
- Check for moisture levels in your crawl space and address any signs of water intrusion immediately.
- Ensure proper ventilation to promote airflow and reduce humidity.
Common Mistakes to Avoid
Avoid these pitfalls during installation:
- Neglecting proper site preparation can lead to future moisture issues.
- Underestimating the type and thickness of vapor barrier material can compromise effectiveness.
- Failing to seal seams and edges properly allows moisture to penetrate.
When to Seek Professional Help
If you’re uncertain about any part of the process or if your crawl space has extensive water damage, seeking professional help may be necessary. Professionals can assess your particular situation and recommend the best course of action, ensuring a thorough and effective installation.
FAQs about Vapor Barrier Installation
1. How do I know if I need a vapor barrier?
A vapor barrier is essential if your crawl space has moisture issues or humidity exceeding 60%. It protects your home’s structure.
2. What type of vapor barrier should I use?
The type of vapor barrier depends on your climate. Generally, polyethylene sheeting is common for residential use, available in various thicknesses.
3. How often should I inspect my vapor barrier?
Inspect your vapor barrier at least once a year, or more frequently if you notice rising moisture levels or signs of mold.
4. Can I install a vapor barrier myself?
Yes, but ensure you follow guidelines carefully. Proper installation is crucial for effectiveness and may require assistance for larger areas.
5. What are the signs of an improperly installed vapor barrier?
Signs include visible moisture, mold growth, and musty odors in the crawl space, indicating the barrier isn’t functioning as intended.